Quarter Pouch Tutorial
Welp! I took my first trip to Aldi yesterday with the Quarter Pouch and I must say it was pretty fun to have. I confidently walked up to the grocery carts, pulled out my keys, took out my quarter and unlocked my cart like a boss. I then spent more than I budgeted at Aldi (but it's okay because I'm feeding 5 this week instead of 3), returned my cart, retrieved my quarter and placed it back into my Quarter Pouch for next week. And then all the other Aldi customers came up to me asking where they could get there own Quarter Pouch because they thought it was the most amazing thing their grocery-shopping eyes had ever seen...
Okay, fine, so that last part didn't happen. I had you for a second though didn't I?
In reality, not a single soul saw my Quarter Pouch in action but I'm pretty sure they would have reacted that way if they had.
Since posting about the finished product last week, a few of you have wanted to see just how this little baby was made so here goes!
I'll preface this tutorial by saying:
Here's what I used to make the Quarter Pouch:

Ok! Now that you have your supplies together, we'll start by cutting out all the pieces we'll need from the fabric for our Quarter Pouch.
We don't want to use the actual quarter as our guide for how big our fabric pieces will be. We want to use something a little larger because we will be losing a lot the fabric in the sewing process. In order to find a good template, I took my quarter into the kitchen and found a spice cap that looked like it would give me enough wiggle-room to sew with.

Now that you've found your template, trace three circles onto each piece of fabric.

We'll use the three circles plus some extra fabric so go ahead and cut a nice square (around the three circles) out of your original fabric piece.

Saving that small square in the upper right-hand corner of the fabric, cut out the three circles.

Awesome! Now you have all the pieces you'll need to complete the Quarter Pouch.
We'll start by sewing together the strap and the button. This is also where all the eye-balling I told you about starts so bear with me.
To make the strap, pick up the square piece of your "outside" pattern. For me, this was the yellow fabric. Think about how wide you want your strap to be, taking into consideration that you will be folding the fabric in half and then losing some of your width to the side you sew on. I wanted a wider strap so I only cut off maybe one-fourth of the square.
Next, I folded my "strap" in half and used my fingernails to make a crease along the edge. Most people would probably iron it and make it all nice but we don't have an ironing board right now so, along with my eye-balling, here enters my MacGyvering.

Annnnd, because we eye-balled, you'll want to trim up the edges a bit to make them more straight.

Woohoo! On to sewing!
I did every step in this project with a double thread, meaning I tied both ends of the thread into one knot after I threaded it onto the needle.

Then I used a straight stitch to sew together the open side of the fabric.

I must take this moment to apologize for how hard it is to see the white thread against the fabric in this project as well as for our little glare-friend in every picture. Maybe I'll work on my photo taking skillz after this.
Okay! Now we want to cut off any excess from the sewn edge.

And now we're ready to turn our strap inside out. This is where you'll need your tweezers. It takes some finagling (sp?) but use your fingers to start folding the fabric right-side-out. You can then use the tweezers to get inside the strap and use them to help pull the rest of the fabric out.

It's a little hard to get it started but eventually the strap does start to turn itself right-side-out.

And, if you're super diligent, pretty soon you'll have a nice little strap.

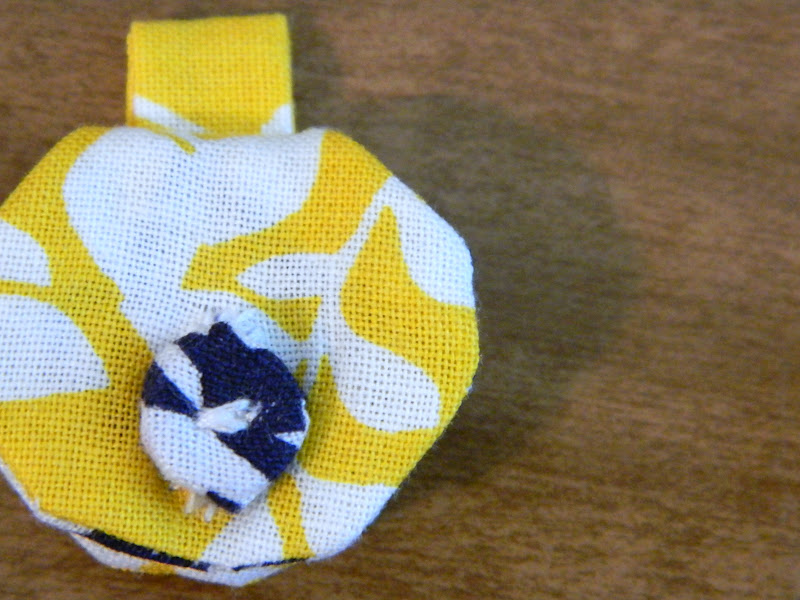
Yea! We've finished the first part of our Quarter Pouch! Now we're going to use the second piece of square fabric (our inside pattern) to cover our button.
Cut a smaller square (just a little bigger than your button) from your bigger square of "inside" fabric. If your fabric has a specific pattern that you want showing on the button, make sure you cut your square according to where that part of the pattern is.
For example, I wanted the button to mainly be covered by a blue houndstooth, not a white one so I made sure that was in the center.

Line up your button in the center of the wrong side of your fabric...

And sew one stitch through each button hole. You can see the white stitch in the middle of the center blue houndstooth.

Okay! Here's where you'll need your thimble. We will continue sewing the button to the fabric by folding the excess fabric over itself on the back of the button.
Here's the first fold...

With another stitch over the original stitch in the front.

Continue folding and stitching...

And folding and stitching.

Because the fabric layers add up quickly, the thimble will help you get the needle through the thick layers. You may need to cut off excess fabric if your original square was too large.

And pretty soon, the entire button will be covered and cute.
Now we've completed the second piece of our Quarter Pouch! Kudos to those who are still with me.
Honestly, those two pieces are probably the hardest because they're so bitty. On to the fun pieces!
We'll start with the actual pouch.
Take one inside pattern circle and one outside pattern circle and place them together with the "right" sides touching in the middle.

Again, if you have a pattern that you want to keep intact, make sure you accommodate for that when you're placing your fabrics together.
For example, I've lined up the houndstooth fabric so that the pattern is running straight up and down.

Okay, once your fabric is lined up correctly and both pieces are directly on top of each other, fold the fabric in half to find where your center line is. I used the pen to mark where the center was by dragging it along the fold.

Sew a straight stitch down that middle line and then cut off the excess fabric from one side of the sewn-together circle.

Now fold your half circle right-side-out and "iron" the edge with your fingernails.

Grab that cute little fabric-covered button you just made (and probably your thimble unless you have freakishly tough skin) and sew it onto the top-center of your half moon (top being the flat side). You'll lose much of the curved side to the sewing process in the next steps so don't be tempted to sew the button directly to the center of the half moon.
Here's the outside...

And here's the inside (houndstooth all lined up and pretty).

Piece three of your Quarter Pouch finished!
Sweet, let's sew the front flap part of our Quarter Pouch.
Take your next two circles of fabric (one being the outside fabric and one being the inside fabric) and place them together again (with the "right" sides touching each other in the middle).

Again, just because forgetting this step would really stink if you wanted your patterns to match, make sure that your fabric patterns are lined up the way you want them to be.
In this case, I made sure that the houndstooth design was straight.

Okay, we have some more eyeballing to do: Place the quarter on top of your fabric circle. We want to sew a line around the quarter that is roughly halfway between the edge of the fabric and the edge of the quarter.

I guess I could have found another random spice top to trace but, let's be real, I just didn't want to get up at that point.
Remember, we're sewing the fabric together inside-out so we have to leave a hole in order to pull the fabric right-side-out. I used my pinky finger to gauge how big the hole should be.

And here's what my sewn line (and hole) look like.

Grab your trusty tweezers again and pull the fabric right-side-out.


Now you'll want to grab your eyeshadow brush (or other thin, rounded-edged object)...

And use the rounded edge to smooth out the seam you've sewn on the inside.

Probably another good opportunity to use an iron buuuuut, like I said, we're ironing board-less so I skipped that step.

Alrighty, so now that we have the front flap, next we're going to sew the back flap and the pouch piece together all at once. I'm a multi-tasker, people.
Okay, so get your last two pieces of circle fabric and place your inside fabric on your work surface "right" side up. Next, place your pouch piece on top of your inside fabric button-side up (make sure to line up your patterns if that applies to your fabric). Lastly, place your outside fabric on top of your pouch piece "wrong" side up.
Lika-so:
We need to sew these pieces together but we want to make sure that the line we sew is similar to the line we sewed on the front flap. So take your front flap and place it on top of your stacked fabric.

As indicated by the front flap, my eyeballing skills were great for sizing the top flap to the quarter but horrible for actually creating a decent circle. Next time I'll find something close to the size I'm looking for to trace.
What's done is done though and we still need to match the size of the back of the Quarter Pouch to the front flap so we're going to trace the front flap onto our stack of un-sewn fabric.


We also need to remember that we have to pull the fabric right-side out annnnnd we have to accommodate not only for fabric but for a button so I used my thumb as a guide for how big of a hole to leave.
Sew a straight stitch along circle you drew...

Annnd, using your tweezers, pull everything right-side-out.

Finally, smooth out the inside seam with your eyebrow brush.
Fits like a glove :)

We're getting somewhere!
Okay, now that we have all the pieces we need for our Quarter Pouch, let's (finally) put them together.
Grab the front flap, strap (forgot you even had that piece, didn't you?) and back flap.

Now, the idea here is to be able to insert the pointy end of the front flap into the hole of the back flap. So! With your tweezers, fold the un-sewn edges of the back flap into the inside of the back flap. You can see how I started with the inside fabric here:

And this is what it looks like with both fabrics folded in:

Now we can slide the front flap into the hole we created in the back flap.


We also want to slide the strap into the hole we created on the back flap so grab your strap and fold it in half.

On the outside of the Quarter Pouch, slide the strap into the hole you created on the back flap.


To sew these three pieces together, we want to hide where the end of our thread is. In order to do that, cut the tail of thread as close to the knot as possible.

Next, push the needle through the inside of the hole you created to the outside (not from the outside of one side to the outside of the other side).

Now you can sew a straight stitch all the way across (and back) without seeing where the stitches started.

End by pushing the needle through the outside of your fabric to the inside and tie a knot. This should also hide your ending knot.

We officially have our Quarter Pouch in one piece!

And we're juuuuust about done. Now all we need is a button hole for our button!
With the front flap down, use your fingers to feel where your button is underneath the flap. Draw a line from the top to the bottom of where you feel the button is.

Now fold that line in half and, with your scissors, cut the length of the line... or until you're able to slide the button through.


Using a blanket stitch, stitch around the button hole. If you need one, there's a video here showing you how to sew a blanket stitch.


After you tie off your blanket stitch, you are as good as done!


Oh! And you need an actual key ring...

But other than that you're done!

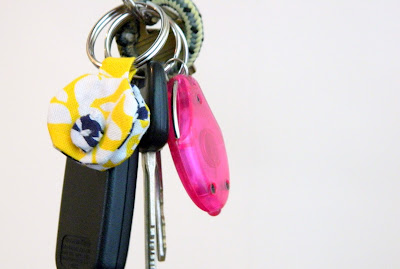
Yippee! Your first (and quite possibly only) Quarter Pouch. Man, those little suckers take some elbow grease!
But your effort has paid off and your Quarter Pouch is now basking in all it's glory on your key chain... so who wants to go to Aldi?!
Update: See some more finished Quarter Pouches here.
Okay, fine, so that last part didn't happen. I had you for a second though didn't I?

In reality, not a single soul saw my Quarter Pouch in action but I'm pretty sure they would have reacted that way if they had.
Since posting about the finished product last week, a few of you have wanted to see just how this little baby was made so here goes!
I'll preface this tutorial by saying:
- I'm, by no means, a seamstress.
- I make up a lot of things a lot of the time.
- I'm more of an eye-baller than a measure-r.
- I'm pretty much guaranteed not to have all the right materials so I work my way around that problem MacGyver-style.
Here's what I used to make the Quarter Pouch:

- Two contrasting pieces of fabric
- Scissors
- Circle Template (I used the lid of a McCormick Spice container)
- Pen
- Needle(s)
- Color-coordinating thread
- Button
- Thimble
- Tweezers
- Eyebrow brush (or something thin with a rounded edge)
- Quarter
Ok! Now that you have your supplies together, we'll start by cutting out all the pieces we'll need from the fabric for our Quarter Pouch.
We don't want to use the actual quarter as our guide for how big our fabric pieces will be. We want to use something a little larger because we will be losing a lot the fabric in the sewing process. In order to find a good template, I took my quarter into the kitchen and found a spice cap that looked like it would give me enough wiggle-room to sew with.

Now that you've found your template, trace three circles onto each piece of fabric.

We'll use the three circles plus some extra fabric so go ahead and cut a nice square (around the three circles) out of your original fabric piece.

Saving that small square in the upper right-hand corner of the fabric, cut out the three circles.

Awesome! Now you have all the pieces you'll need to complete the Quarter Pouch.
We'll start by sewing together the strap and the button. This is also where all the eye-balling I told you about starts so bear with me.
To make the strap, pick up the square piece of your "outside" pattern. For me, this was the yellow fabric. Think about how wide you want your strap to be, taking into consideration that you will be folding the fabric in half and then losing some of your width to the side you sew on. I wanted a wider strap so I only cut off maybe one-fourth of the square.
 |
| "X's" indicate what isn't going to be used. |
Next, I folded my "strap" in half and used my fingernails to make a crease along the edge. Most people would probably iron it and make it all nice but we don't have an ironing board right now so, along with my eye-balling, here enters my MacGyvering.

Annnnd, because we eye-balled, you'll want to trim up the edges a bit to make them more straight.

Woohoo! On to sewing!
I did every step in this project with a double thread, meaning I tied both ends of the thread into one knot after I threaded it onto the needle.

Then I used a straight stitch to sew together the open side of the fabric.

I must take this moment to apologize for how hard it is to see the white thread against the fabric in this project as well as for our little glare-friend in every picture. Maybe I'll work on my photo taking skillz after this.
Okay! Now we want to cut off any excess from the sewn edge.

And now we're ready to turn our strap inside out. This is where you'll need your tweezers. It takes some finagling (sp?) but use your fingers to start folding the fabric right-side-out. You can then use the tweezers to get inside the strap and use them to help pull the rest of the fabric out.

It's a little hard to get it started but eventually the strap does start to turn itself right-side-out.

And, if you're super diligent, pretty soon you'll have a nice little strap.

Yea! We've finished the first part of our Quarter Pouch! Now we're going to use the second piece of square fabric (our inside pattern) to cover our button.
Cut a smaller square (just a little bigger than your button) from your bigger square of "inside" fabric. If your fabric has a specific pattern that you want showing on the button, make sure you cut your square according to where that part of the pattern is.
For example, I wanted the button to mainly be covered by a blue houndstooth, not a white one so I made sure that was in the center.

Line up your button in the center of the wrong side of your fabric...

And sew one stitch through each button hole. You can see the white stitch in the middle of the center blue houndstooth.

Okay! Here's where you'll need your thimble. We will continue sewing the button to the fabric by folding the excess fabric over itself on the back of the button.
Here's the first fold...

With another stitch over the original stitch in the front.

Continue folding and stitching...

And folding and stitching.

Because the fabric layers add up quickly, the thimble will help you get the needle through the thick layers. You may need to cut off excess fabric if your original square was too large.

And pretty soon, the entire button will be covered and cute.
 |
| Back |
 |
| Front |
Honestly, those two pieces are probably the hardest because they're so bitty. On to the fun pieces!
We'll start with the actual pouch.
Take one inside pattern circle and one outside pattern circle and place them together with the "right" sides touching in the middle.

Again, if you have a pattern that you want to keep intact, make sure you accommodate for that when you're placing your fabrics together.
For example, I've lined up the houndstooth fabric so that the pattern is running straight up and down.

Okay, once your fabric is lined up correctly and both pieces are directly on top of each other, fold the fabric in half to find where your center line is. I used the pen to mark where the center was by dragging it along the fold.

Sew a straight stitch down that middle line and then cut off the excess fabric from one side of the sewn-together circle.

Now fold your half circle right-side-out and "iron" the edge with your fingernails.

Grab that cute little fabric-covered button you just made (and probably your thimble unless you have freakishly tough skin) and sew it onto the top-center of your half moon (top being the flat side). You'll lose much of the curved side to the sewing process in the next steps so don't be tempted to sew the button directly to the center of the half moon.
Here's the outside...

And here's the inside (houndstooth all lined up and pretty).

Piece three of your Quarter Pouch finished!
Sweet, let's sew the front flap part of our Quarter Pouch.
Take your next two circles of fabric (one being the outside fabric and one being the inside fabric) and place them together again (with the "right" sides touching each other in the middle).

Again, just because forgetting this step would really stink if you wanted your patterns to match, make sure that your fabric patterns are lined up the way you want them to be.
In this case, I made sure that the houndstooth design was straight.

Okay, we have some more eyeballing to do: Place the quarter on top of your fabric circle. We want to sew a line around the quarter that is roughly halfway between the edge of the fabric and the edge of the quarter.

I guess I could have found another random spice top to trace but, let's be real, I just didn't want to get up at that point.
Remember, we're sewing the fabric together inside-out so we have to leave a hole in order to pull the fabric right-side-out. I used my pinky finger to gauge how big the hole should be.

And here's what my sewn line (and hole) look like.

Grab your trusty tweezers again and pull the fabric right-side-out.


Now you'll want to grab your eyeshadow brush (or other thin, rounded-edged object)...

And use the rounded edge to smooth out the seam you've sewn on the inside.

Probably another good opportunity to use an iron buuuuut, like I said, we're ironing board-less so I skipped that step.

Alrighty, so now that we have the front flap, next we're going to sew the back flap and the pouch piece together all at once. I'm a multi-tasker, people.
Okay, so get your last two pieces of circle fabric and place your inside fabric on your work surface "right" side up. Next, place your pouch piece on top of your inside fabric button-side up (make sure to line up your patterns if that applies to your fabric). Lastly, place your outside fabric on top of your pouch piece "wrong" side up.
Lika-so:
 |
| Un-stacked |
 |
| Stacked |

As indicated by the front flap, my eyeballing skills were great for sizing the top flap to the quarter but horrible for actually creating a decent circle. Next time I'll find something close to the size I'm looking for to trace.
What's done is done though and we still need to match the size of the back of the Quarter Pouch to the front flap so we're going to trace the front flap onto our stack of un-sewn fabric.


We also need to remember that we have to pull the fabric right-side out annnnnd we have to accommodate not only for fabric but for a button so I used my thumb as a guide for how big of a hole to leave.
Sew a straight stitch along circle you drew...

Annnd, using your tweezers, pull everything right-side-out.

Finally, smooth out the inside seam with your eyebrow brush.
Fits like a glove :)

We're getting somewhere!
Okay, now that we have all the pieces we need for our Quarter Pouch, let's (finally) put them together.
Grab the front flap, strap (forgot you even had that piece, didn't you?) and back flap.

Now, the idea here is to be able to insert the pointy end of the front flap into the hole of the back flap. So! With your tweezers, fold the un-sewn edges of the back flap into the inside of the back flap. You can see how I started with the inside fabric here:

And this is what it looks like with both fabrics folded in:

Now we can slide the front flap into the hole we created in the back flap.


We also want to slide the strap into the hole we created on the back flap so grab your strap and fold it in half.

On the outside of the Quarter Pouch, slide the strap into the hole you created on the back flap.


To sew these three pieces together, we want to hide where the end of our thread is. In order to do that, cut the tail of thread as close to the knot as possible.

Next, push the needle through the inside of the hole you created to the outside (not from the outside of one side to the outside of the other side).

Now you can sew a straight stitch all the way across (and back) without seeing where the stitches started.

End by pushing the needle through the outside of your fabric to the inside and tie a knot. This should also hide your ending knot.

We officially have our Quarter Pouch in one piece!

And we're juuuuust about done. Now all we need is a button hole for our button!
With the front flap down, use your fingers to feel where your button is underneath the flap. Draw a line from the top to the bottom of where you feel the button is.

Now fold that line in half and, with your scissors, cut the length of the line... or until you're able to slide the button through.


Using a blanket stitch, stitch around the button hole. If you need one, there's a video here showing you how to sew a blanket stitch.


After you tie off your blanket stitch, you are as good as done!


Oh! And you need an actual key ring...

But other than that you're done!
Yippee! Your first (and quite possibly only) Quarter Pouch. Man, those little suckers take some elbow grease!
But your effort has paid off and your Quarter Pouch is now basking in all it's glory on your key chain... so who wants to go to Aldi?!
Update: See some more finished Quarter Pouches here.


Comments
Post a Comment